Wildix
These instructions help you configure your Wildix to work with TIM Enterprise. Contact your system maintainer if you are not familiar with the configuration of your PBX.
Support files
Ensure the following support files exist in the /config/ folder of the TIM Enterprise application:
Wildix.TDT
Wildix.TDS
Contents
TIM Enterprise Cloud Connection Wizard
The fastest and easiest way to set up your Wildix connection is to use the TIM Enterprise Cloud connection wizard. This will connect directly to your system and set up a Server to Server application, and Callback URL properties for you.
In the TIM Enterprise directory, you can add a Cloud Service under New object.
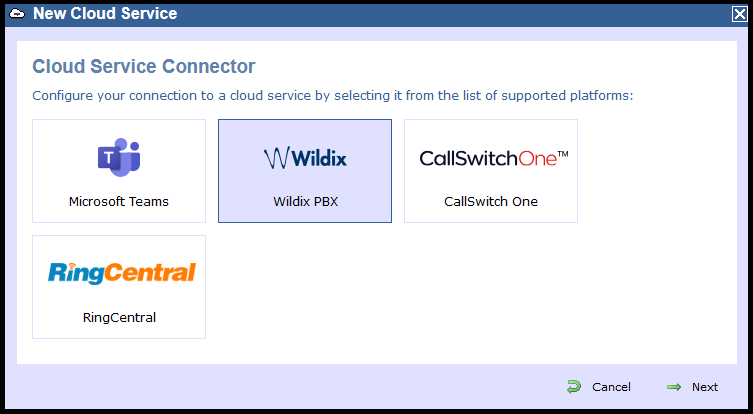
Select the Wildix wizard, and you will be presented with the screen below.
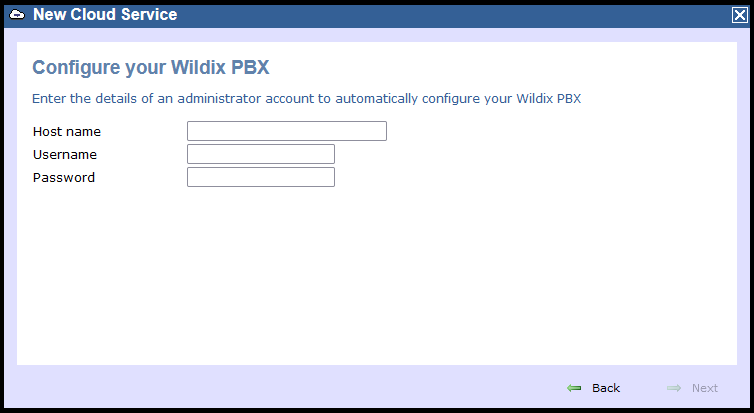
- Enter your Wildix PBX URL into the Hostname**, e.g.
http://yourcompany.wildixin.com - Enter the username that has Admin access to your Wildix PBX
- Enter the password for the Admin account
Once the wizard has finished you are all setup to collect data from your Wildix system!
Manual configuration
If you'd prefer to make the changes to your Wildix PBX yourself, details to assist you with this are below.
Getting tenant details
You will need an OpenCDR tenant to be able to get the live CDR information from the Wildix. To do this please contact our Support Team
Integration screen
Once you have your OpenCDR tenant details you will need to log into your Wildix system. Once you are logged in, you will need to head over to the Integration section, as shown below.
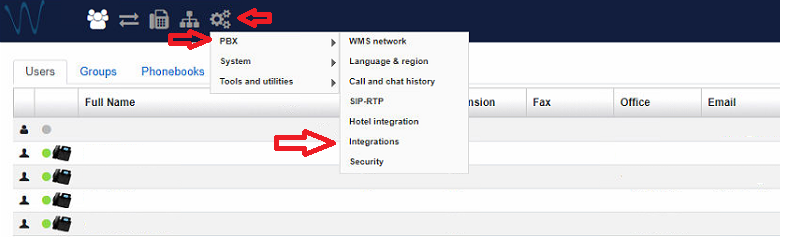
Here you will be able to set up the Server to Server application to get the basic CDR, and the Callback URLs to enhance the information available for reporting.
Callback URLs
The first screen you will be presented with is the Callback URLs subsection. This will send events to our OpenCDR service. This service will allow TIM Enterprise to collect these details to enhance your call reporting.
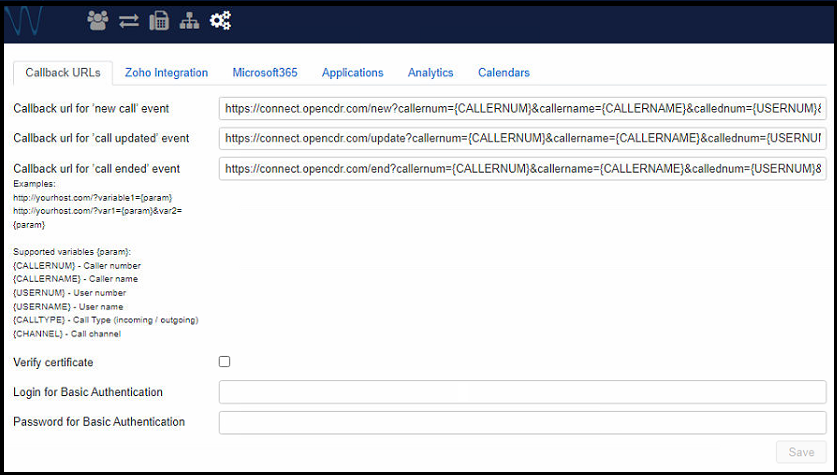
In this section you will need to configure the Callback URL locations, so the events can be sent as below.
https://connect.opencdr.com/new?callernum={CALLERNUM}&callername={CALLERNAME}&callednum={USERNUM}&calledname={USERNAME}&type={CALLTYPE}&channel={CHANNEL}
https://connect.opencdr.com/update?callernum={CALLERNUM}&callername={CALLERNAME}&callednum={USERNUM}&calledname={USERNAME}&type={CALLTYPE}&channel={CHANNEL}
https://connect.opencdr.com/end?callernum={CALLERNUM}&callername={CALLERNAME}&callednum={USERNUM}&calledname={USERNAME}&type={CALLTYPE}&channel={CHANNEL}
To be able to send these events you will need a valid Basic Authentication Login / Password for our OpenCDR services. Please contact support if you do not have these.
Once all these settings have been added don't forget to Save!
Server-to-Server Application
On this screen an application needs to be created to allow TIM Enterprise to collect the CDR data from the Wildix.
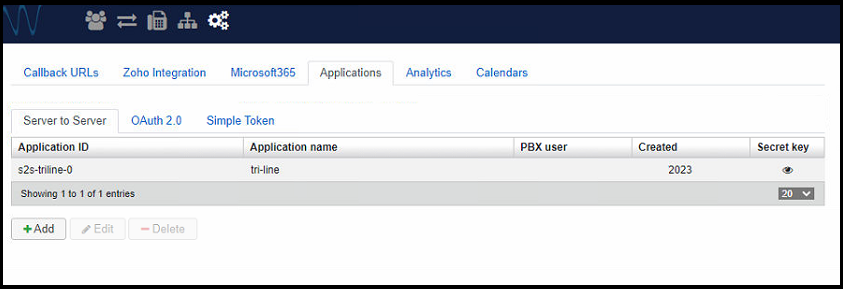
To create a new Server to Server application click on Add and then set the Application name as tri-line.
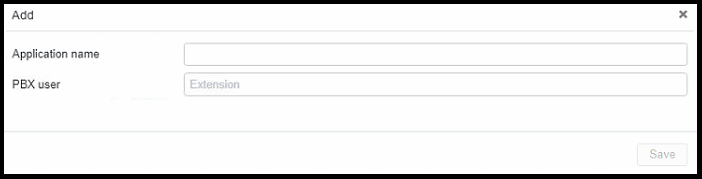
The PBX user needs to have writes to access the CDR system. The easiest way would be to select a user who is part of the Admin group.
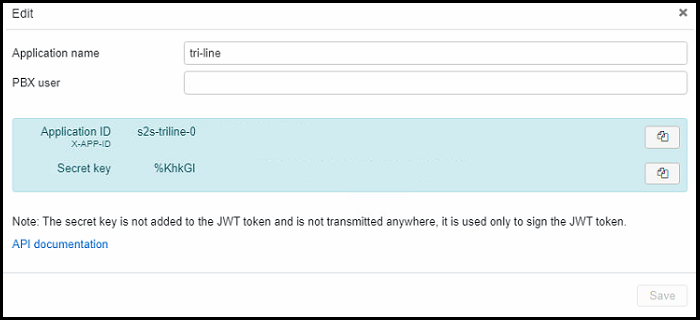
Once the application is added, click on ![]() and copy the Application name, Application ID and Secret key for use during the TIM Enterprise setup.
and copy the Application name, Application ID and Secret key for use during the TIM Enterprise setup.
TIM Enterprise
Now that the Wildix is all setup we need to create a PBX object, and a synchronisation object, in the TIM Enterprise directory to start collecting data.
Firstly add a PBX object using New object. This will be configured later, but for now, it needs to exist for adding a Directory Sync. Add one using the New object and then select the properties context menu on it.
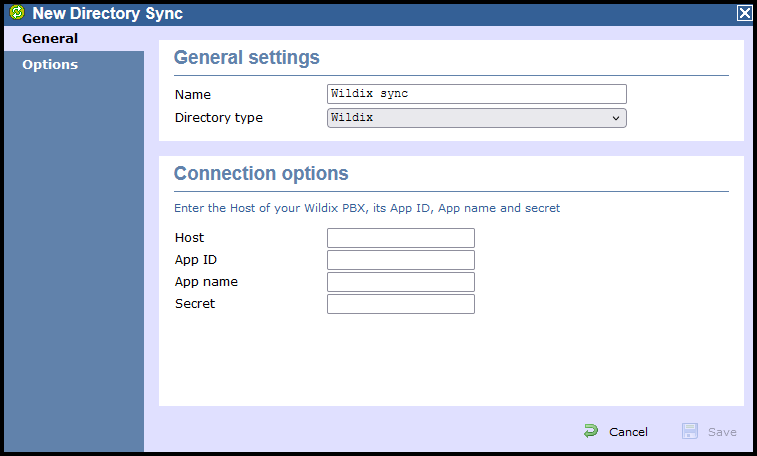
Sync config
The details entered here will allow TIM Enterprise to collect a list of users from your Wildix PBX and autopopulate TIM Enterprise with these details. By default, this user synchronisation will happen once a day.
Once you edit the sync object properties you will be presented with the screen below.
PBX config
Now that the sync has been added the PBX object properties need to be configured by using the Properties item on the directory context menu.
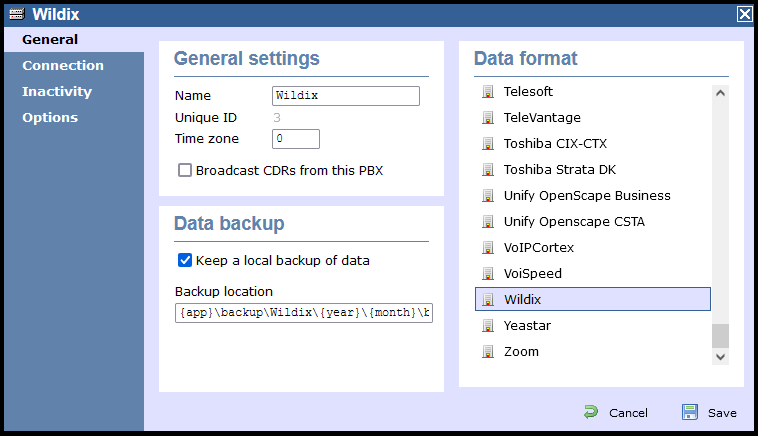
Once opened, enable backups on this screen and also select Wildix as the Data format.
Change over to the Connection tab and select Cloud connection, then Wildix, to get to the screen below.
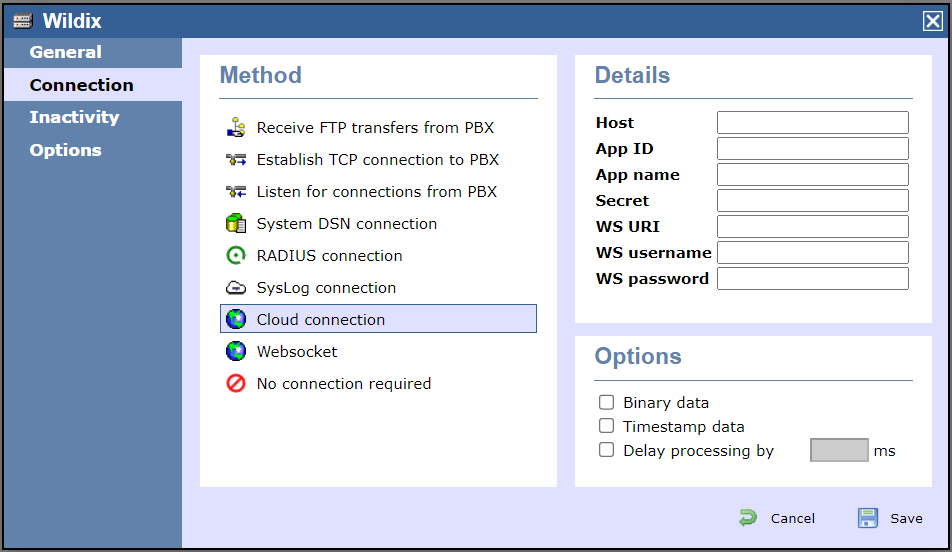
Here is where the properties saved from the Wildix need to be added.
Add your Wildix PBX URL in the Host, so TIM Enterprise knows where to connect for data. This could be for example:
http://yourcompany.wildixin.comAdd the Application ID from the Wildix Server to Server application into the App ID field
Add the Application name from the Wildix Server to Server application into the App name field
Add the Secret key from the Wildix Server to Server application into the Secret field
Enter
wss://connect.opencdr.com/wsinto the WS URI fieldEnter the Basic authentication username used during the Callback URI stage into the WS username field
Enter the Basic authentication password used during the Callback URI stage into the WS password field
This completes the Wildix setup for TIM Enterprise. Don't forget to press Save!